How to Add Funds to Your gold365 Account – Complete Step‑by‑Step Guide
Introduction
Investing in gold has never been more accessible thanks to digital platforms like gold365. Whether you are a seasoned trader or a first‑time investor, the ability to add funds to your account swiftly and securely is paramount. This article provides a comprehensive, professional guide on how to add funds to your gold365 account, covering every payment method, common pitfalls, and best‑practice security tips. By the end of this guide, you will be equipped with the knowledge to fund your digital gold portfolio confidently, ensuring a smooth trading experience.
Understanding the gold365 Platform
gold365 operates as a fully regulated online marketplace for buying, selling, and storing digital gold. The platform is built on a robust technological infrastructure that integrates real‑time market data, secure transaction processing, and a user‑friendly interface. To begin using the service, users must first create an account via the gold365 official register page, verify their identity, and complete the KYC process. Once the account is approved, you can access the dashboard where all portfolio activities, including fund additions, are managed.
Why Adding Funds Is Essential
Adding funds to your gold365 account serves several critical functions:
- Liquidity: Sufficient balance enables immediate execution of buy orders without waiting for fund transfers.
- Market Participation: Gold markets operate 24/7; having readily available capital allows you to capitalize on price movements at any time.
- Operational Efficiency: A well‑funded account reduces the frequency of fund‑related notifications, streamlining your trading workflow.
Supported Payment Methods
gold365 supports a variety of payment channels to accommodate different user preferences and regional banking systems. The most common methods include:
Bank Transfer (NEFT/RTGS/IMPS)
Direct transfers from your bank account to gold365’s designated settlement account. This method is widely used for its reliability and traceability.
Unified Payments Interface (UPI)
Instantaneous fund transfer using UPI IDs, offering a frictionless experience for mobile users.
Credit/Debit Cards
Visa, Mastercard, and Rupay cards are accepted, providing a quick top‑up option for users who prefer card payments.
E‑Wallets
Popular wallets such as Paytm, PhonePe, and Google Pay are integrated, enabling seamless fund addition directly from your digital wallet balance.
Step‑by‑Step Guide: Adding Funds via Bank Transfer
Follow these detailed steps to add funds through a bank transfer:
- Log in to your gold365 dashboard using your gold365 official login credentials.
- Navigate to the “Add Funds” section located in the “Wallet” menu.
- Select “Bank Transfer” as your preferred payment method.
- Copy the provided beneficiary details, including the account number, IFSC code, and bank name.
- Log in to your online banking portal or visit a branch to initiate the transfer. Ensure you mention the unique reference ID displayed on the gold365 page.
- Enter the amount you wish to transfer and confirm the transaction.
- After successful transfer, the status will appear as “Pending” on gold365. Funds are typically credited within 30‑60 minutes for IMPS, while NEFT/RTGS may take up to 2 business days.
- Refresh your wallet page; the credited amount will be reflected in your available balance.
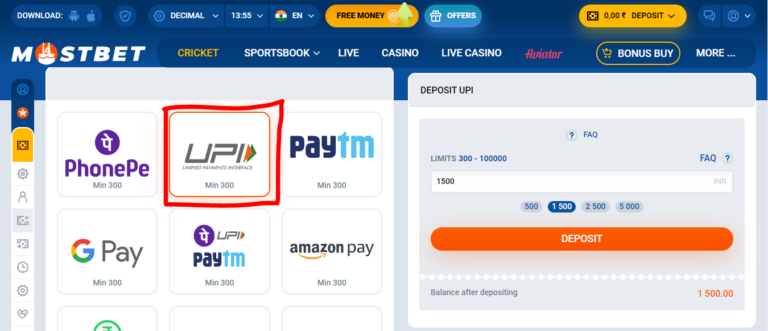
Step‑by‑Step Guide: Adding Funds via UPI
UPI offers a swift, real‑time transfer experience. Here’s how to fund your account:
- Log in to your gold365 account.
- Open the “Add Funds” tab and choose “UPI” as the payment method.
- The platform will generate a QR code and display a UPI ID tied to gold365’s settlement account.
- Open your preferred UPI app (e.g., PhonePe, Google Pay, BHIM).
- Scan the QR code or manually enter the UPI ID and the exact amount you wish to add.
- Confirm the transaction; you will receive an OTP or PIN prompt for authentication.
- Upon successful completion, the amount is instantly reflected in your gold365 wallet.
Step‑by‑Step Guide: Adding Funds via Credit/Debit Card
Card payments are processed through a secure gateway. Follow these instructions:
- Log in and go to “Add Funds”.
- Select “Card Payment”.
- Enter your card details: card number, expiry date, CVV, and the cardholder’s name.
- Specify the fund amount and click “Proceed”.
- You may be redirected to a 3‑D Secure authentication page; complete the OTP verification.
- After authentication, the transaction is approved, and funds appear in your wallet within minutes.
Step‑by‑Step Guide: Adding Funds via E‑Wallets
E‑wallet integration simplifies the funding process for users who prefer digital wallets:
- Log into gold365 and access “Add Funds”.
- Choose “E‑Wallet” and select your preferred wallet from the list.
- You will be redirected to the wallet’s payment page; log in if required.
- Enter the amount and confirm the payment.
- Once the wallet confirms the transaction, gold365 will automatically credit your account.
Common Issues and Troubleshooting
Even with a streamlined system, users occasionally encounter challenges. Below are typical problems and their resolutions:
Funds Not Reflected After Transfer
Check the transaction reference ID; if the transfer is marked “Pending,” allow up to 2 business days for NEFT/RTGS. For IMPS/UPI, contact your bank if the status remains “Failed.”
Payment Gateway Declines Card Transactions
Possible reasons include insufficient funds, incorrect card details, or the card’s bank blocking the merchant category code (MCC). Verify details and contact your bank if necessary.
OTP Not Received for UPI or Card Authentication
Ensure your registered mobile number is active and not facing network issues. Retry after a few minutes, or use an alternative authentication method if available.
Security Considerations When Adding Funds
Security is a top priority for gold365 and its users. Follow these best practices to safeguard your financial data:
- Two‑Factor Authentication (2FA): Enable 2FA in the account settings to add an extra verification layer during login and fund transfers.
- Secure Network: Perform transactions on trusted Wi‑Fi or mobile data; avoid public hotspots.
- Verified Payment Channels: Use only the official payment options presented within the gold365 platform. Never share your bank or card details outside the secured portal.
- Regular Monitoring: Review your transaction history regularly to detect any unauthorized activity promptly.
Frequently Asked Questions (FAQs)
What is the minimum amount I can add to my gold365 wallet?
The platform typically sets a minimum of INR 500 for most payment methods, though promotional offers may reduce this threshold.
Do I incur any fees when adding funds?
Gold365 does not charge a direct fee for fund addition; however, banks or payment gateways may impose nominal transaction charges, especially for card payments.
Can I withdraw funds back to my bank account?
Yes, you can initiate a withdrawal from the “Wallet” section. Withdrawal processing times vary by method, with UPI typically completing within minutes.
Is there a limit on how many times I can top up per day?
Daily limits depend on the chosen payment method and your KYC verification level. Fully verified accounts enjoy higher limits.
Conclusion
Adding funds to your gold365 account is a straightforward process when you follow the proper steps and adhere to security best practices. By leveraging bank transfers, UPI, cards, or e‑wallets, you can maintain a liquid portfolio ready to seize market opportunities instantly. Remember to keep your account credentials secure, verify transaction details, and monitor your wallet regularly. With the knowledge provided in this guide, you are now prepared to fund your digital gold investments efficiently and safely, positioning yourself for success in the ever‑dynamic gold market.